

Publish a video or a live
Upload a video
To publish a video you have to click the Publish button in the Left Menu. Once clicked you have 3 ways to upload a video:
- by selecting a file on your device;
- by importing an online video by its URL;
- by importing an online video by its URI (torrent).
Upload a file
Once you have to click the Publish button in the left menu:
- select which channel you want to upload your video (can be done/change after upload);
- select privacy settings for this video (can be done/change after upload);
- click Select file to upload button.
While the video is uploading you can set some details.
Import with URL
If the administrator of your PeerTube platform enabled this option, you can import any URL supported by youtube-dl or URL that points to a raw MP4 file. To do so, you have to:
- click the Publish button in the left menu;
- click Import with URL tab;
- paste your video's url into URL field;
- select which channel you want to upload your video (can be done/change after upload);
- select privacy settings for this video (can be done/change after upload);
- click Import button.
WARNING
You should make sure you have diffusion rights over the content it points to, otherwise it could cause legal trouble to yourself and your PeerTube platform.
While the video is uploading you can set some details.
Import with torrent
If the administrator of your PeerTube platform enabled this option, you can import any torrent file that points to a mp4 file. To do so, you have to:
- click the Publish button in the left menu;
- click Import with torrent tab;
- select a
.torrentfile on your commputer or paste magnet URI of a video; - select which channel you want to upload your video (can be done/change after upload);
- select privacy settings for this video (can be done/change after upload);
- click Import button.
WARNING
You should make sure you have diffusion rights over the content it points to, otherwise it could cause legal trouble to yourself and your PeerTube platform.
While the video is uploading you can set some details.
Publish a live
If the administrator of your PeerTube platform enabled this option, you can create a live using PeerTube and a streaming software (for example OBS). To do so, you have to:
- click the Publish button in the left menu;
- click Go live tab;
- select which channel you want to publish your live;
- select privacy settings for this live;
- select if you want:
- a Normal live: stream only once, replay will replace your live
- a Permanent/recurring live: stream multiple times, replays will be separate videos
- click Go Live button.

In the publication form, you have a Live settings tab that allows you to:
- See the RTMP URL to put in your streaming software
- See the live stream key associated to this live, to put in your streaming software. It is a private key, allowing anyone to stream a video in this live so don't share it with anyone!
Now you're ready to go live!
Live examples
With OBS
In this example we'll use OBS software to send a stream to PeerTube, but you can use any streaming software that can stream videos using the RTMP protocol.
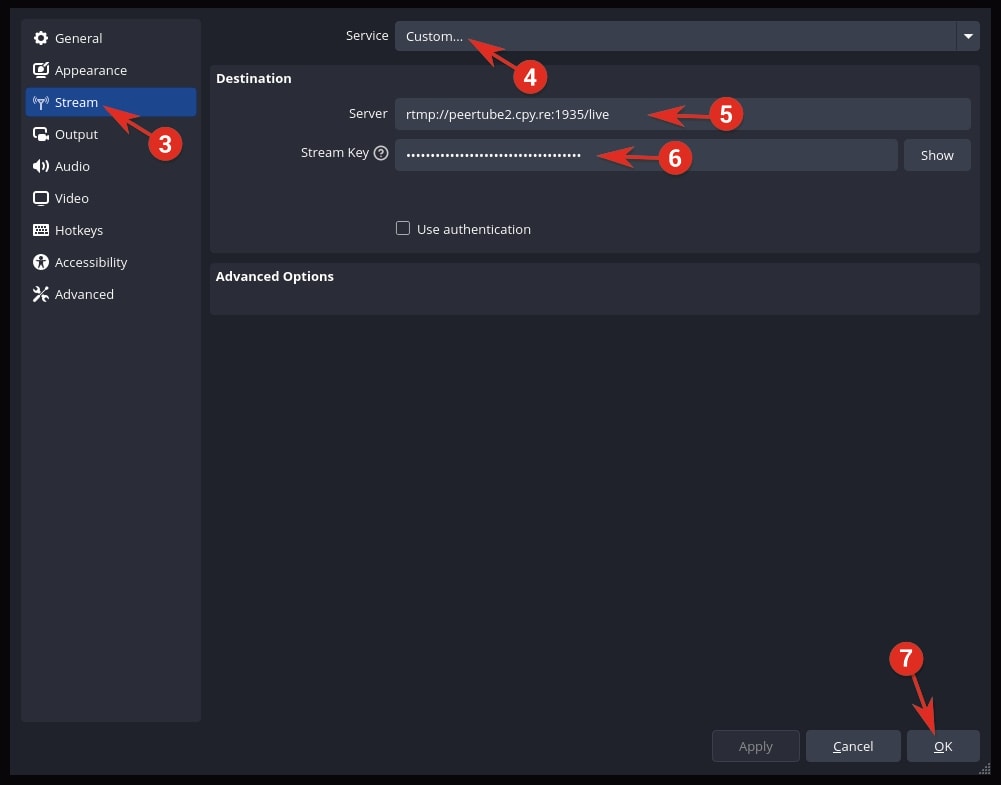
- Open OBS on your computer
- Click on Settings (or: File in top bar > Settings)
- Click on Streams tab
- Choose Custom service
- Fill Server input using the PeerTube RTMP URL
- Fill Stream key input using your live stream key
- Do not use authentication and click on OK
- Stream whatever your want and click on Start streaming. After some time, you'll be able to see your live in the PeerTube interface.
With Jitsi Meet
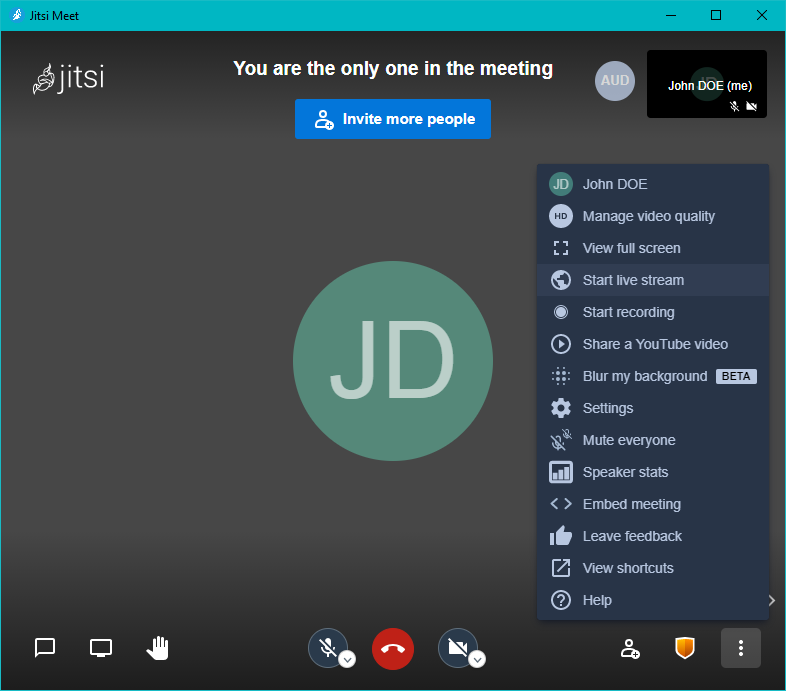
If you want to easily broadcast a webinar or a conference, you can use Jitsi Meet as the videoconferencing tool, and transfer the feed to PeerTube for livestreaming. This is a great solution for events where the expected audience turnout is too large for Jitsi to handle, but only a few people are actually talking/presenting.
- Create a meeting room on a Jitsi server that has livestreaming enabled, such as the the official public and moderated instance.
- Click on the menu (3-points icon at the bottom-right of the screen)
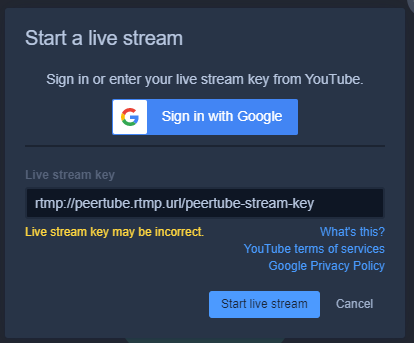
- Click on Start live stream. Close the separate pop-up browser window prompting you to sign into a YouTube account.
- In the Start a livestream window's Livestream key field, paste the PeerTube RTMP URL followed by the PeerTube live stream key, adding a slash in-between (ex:
rtmp://peertube.rtmp.url/peertube-stream-key) - Click Start live stream. You may hear an audio indicator that the livestreaming is on, and see a LIVE button at the top-right. Afterwards, your meeting will begin livestreaming on PeerTube with a delay, depending on the latency set.
Video fields
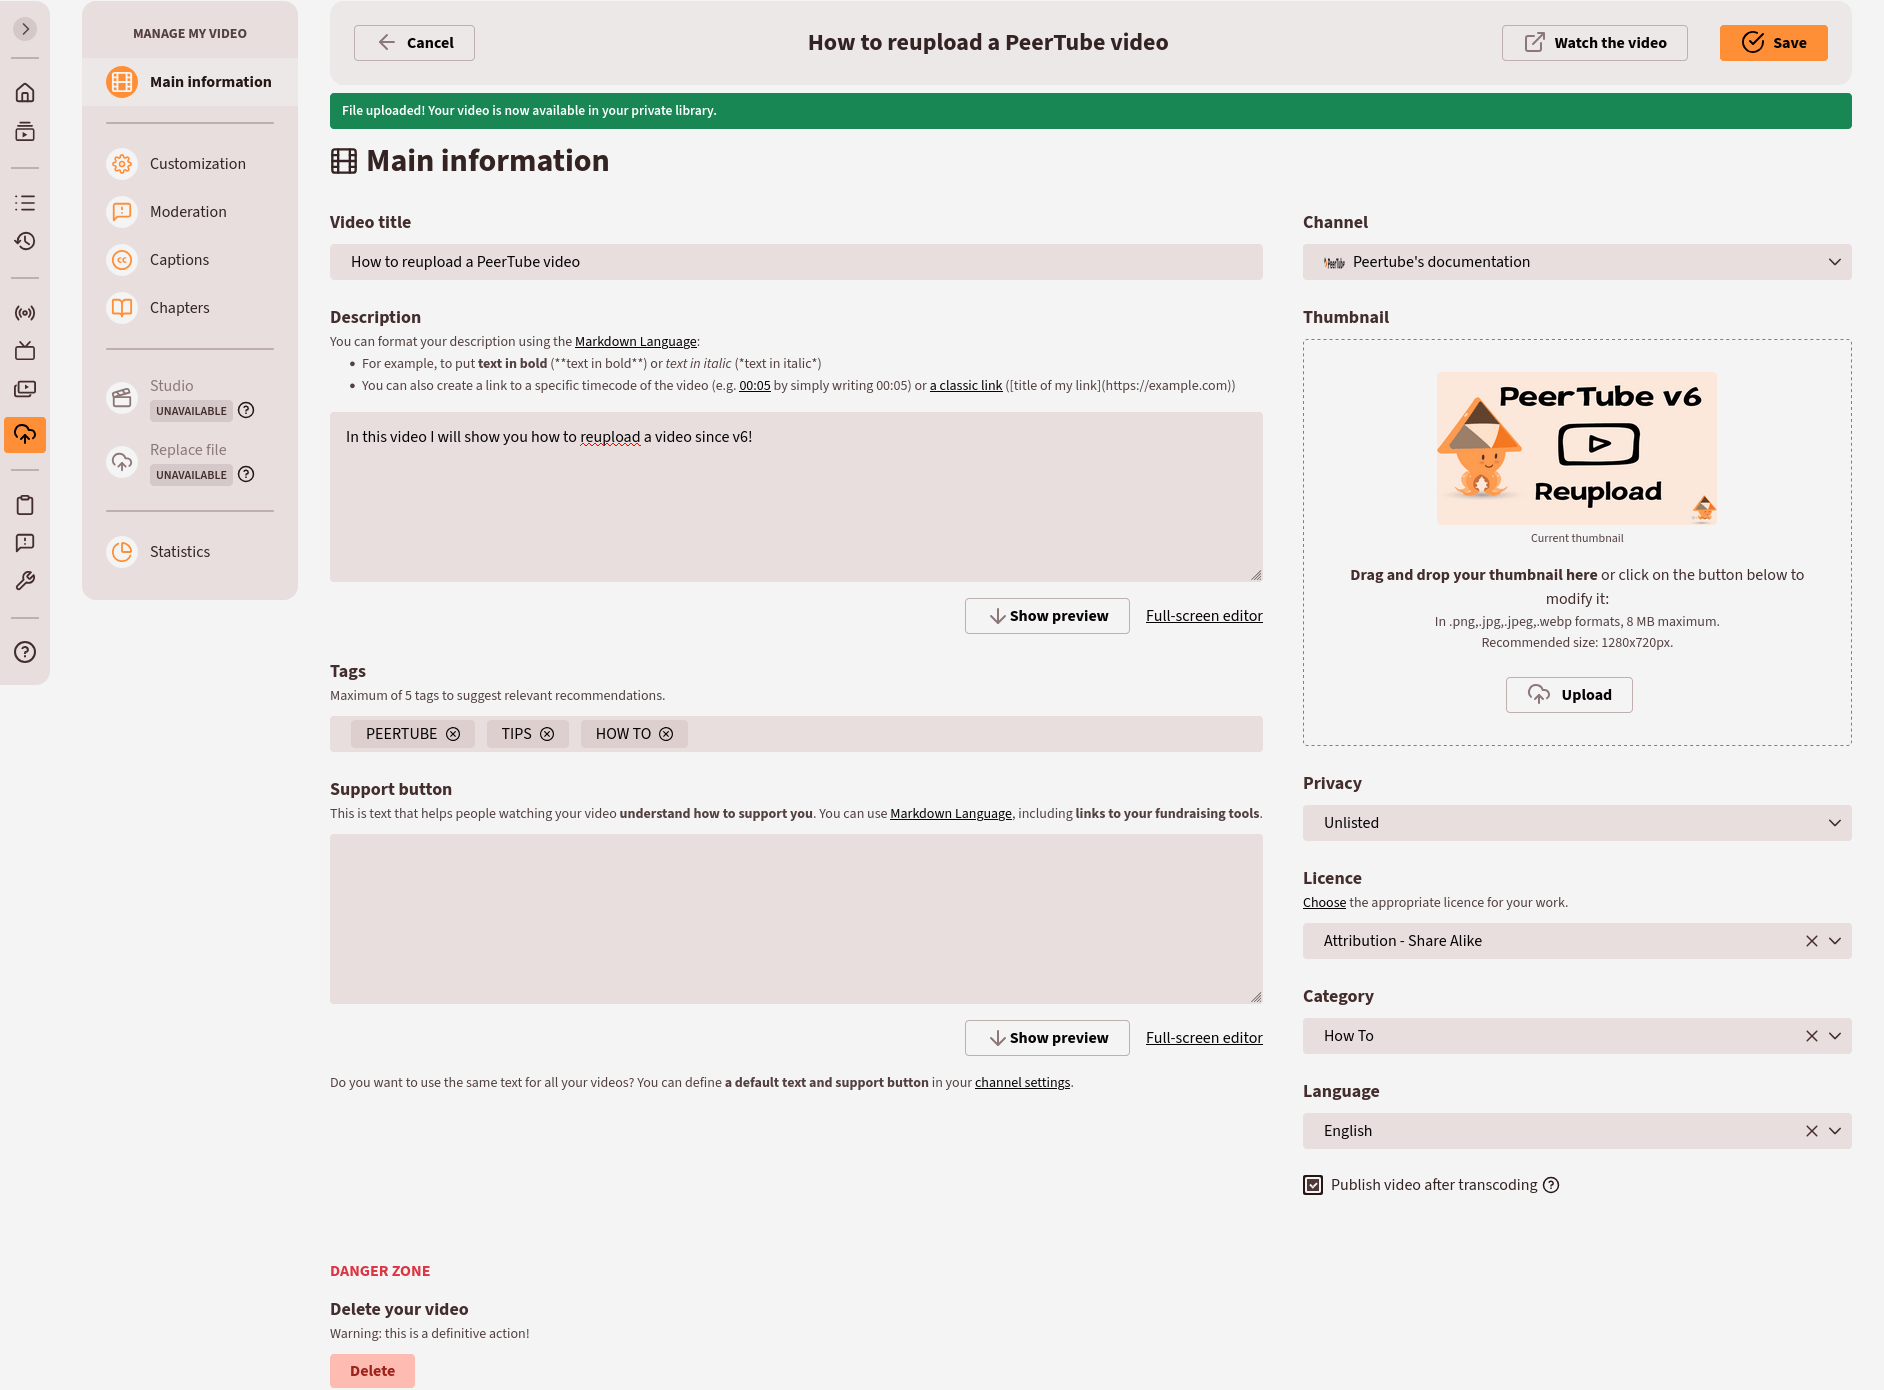
Main information
- Video Title: the name of the video (something more catchy than
myvideo.mp4for example 😉 ); - Description: text you want to display above your video (supports markdown) - you can see how it looks above;
- Tags: tags can be used to suggest revelant recommandations. 5 tags maximum. You have to press enter to add one;
- Support button: this is text that helps people watching your video understand how to support you. You can use Markdown Language, including links to your fundraising tools.
- Channel: in which channel you want to add your video;
- Thumbnail: an image in
.png,.jpg,.jpeg,.webpformats, 8 MB maximum, and recommended size1280x720pxto illustrate your video; - Privacy: public, internal, unlisted, private. See what it means;
- Licence:
- Attribution,
- Attribution - Share Alike,
- Attribution - No Derivatives,
- Attribution - Non Commercial,
- Attribution - Non Commercial - Share Alike,
- Attribution - Non Commercial - No Derivatives,
- Public Domain Dedication;
- Category: what kind of content is your video (Activism? How to? Music?);
- Language: what is the main language in the video;
- Publish video after transcoding: the video may be unplayable during the transcoding process. It's the reason why we prefer to publish publicly the video after transcoding.
- Danger zone:
- Change ownership of your video: A modal window will open for you to specify the local account to which you want to transfer your video
- Delete your video: warning, this is a definitive action!
Customization
- Filename: name of the uploaded file
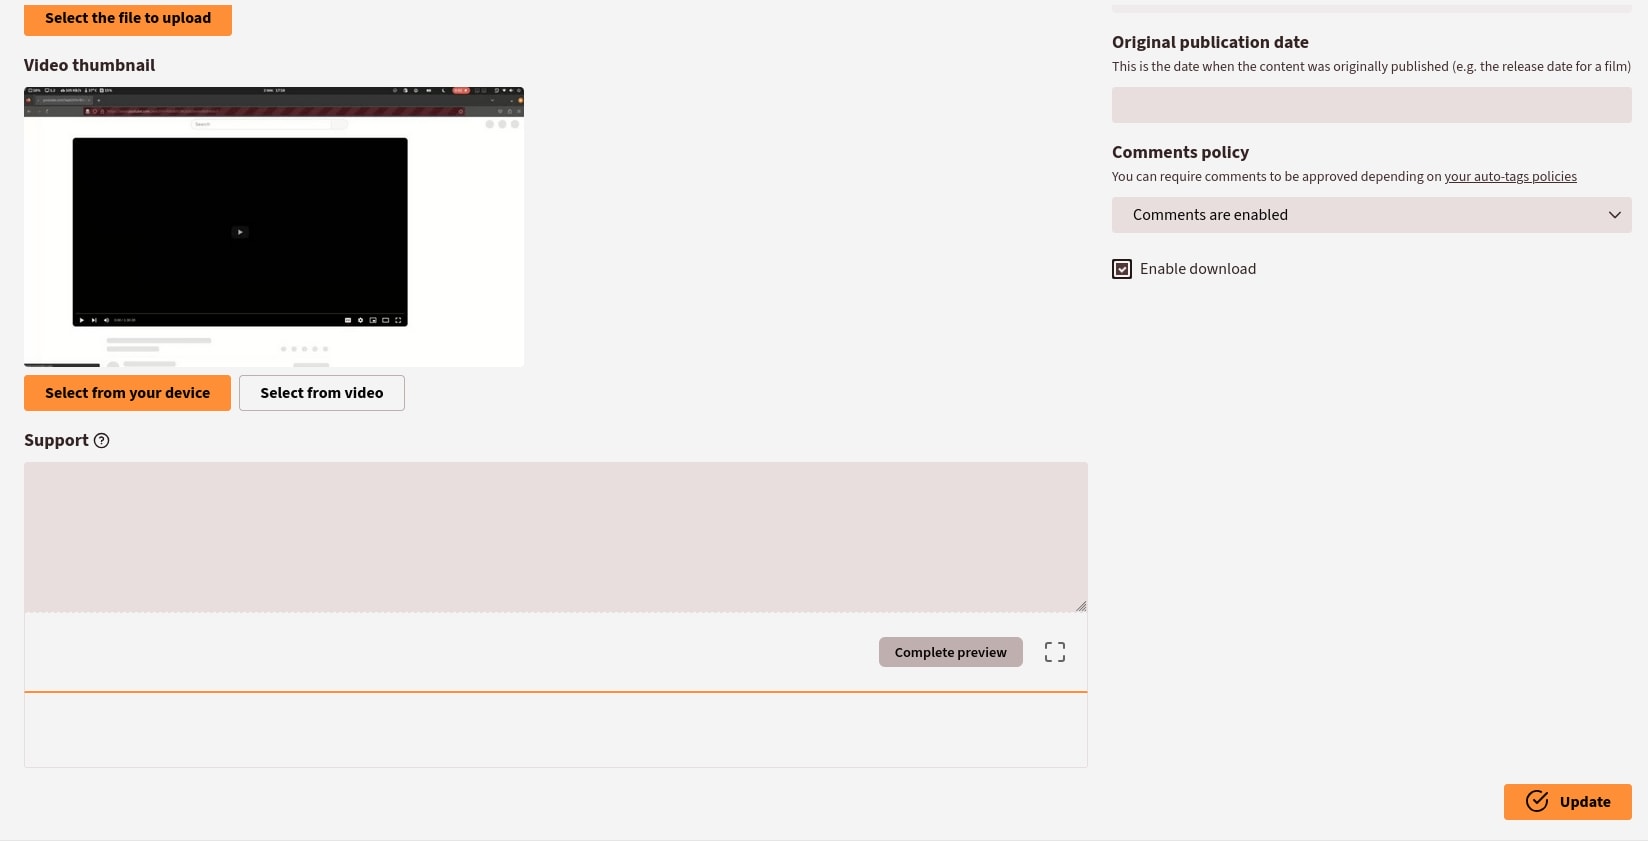
- Original publication date: this is the date when the content was originally published (e.g. the release date for a film)
- Enable download: enable or disable the possibility to download the video
- Player theme: force the player theme for this video (only used by the web player)

Moderation
- Comments policy (you can require comments to be approved depending on your auto-tags policies):
- Comments are disabled
- Comments are enabled (comments may require approval depending on your auto tag policies)
- Any new comment requires approval
- Your video contains sensitive content: describe what makes your content sensitive
- Help viewers to identify your sensitive content (enabled if sensitive content box is checked):
- Some images may be violent
- Content may be perceived as sexually explicit material
- Restrict embed to the following domains to disallow sites from embedding a video (you can add exceptions in the Allowed domains field)
Captions
Automatic transcription PeerTube >= 6.2
If enabled by the PeerTube platform admin, uploaded videos will automatically be subtitled. You still can edit or remove these subtitles after they are published.
Manual transcription
This tab allows you to add subtitles to your video. To add one, you have to:
- go to Captions tab;
- click Add a caption button;
- select the caption language in the list;
- click Select the caption file button;
- browse into your computer file to select your
.vttor.srtfile; - click Add this caption button;
- click Publish / Update button.
Your caption is now available by clicking > Subtitles/CC and selecting the language.
To delete a caption you have to:
- click Delete button in front of the language you want to delete;
- click Update button.
Transcription widget
Users can open a transcription widget to display subtitles next to the video (see here).
Chapters PeerTube >= 6.0
To add chapters, you have to:
- click on … under your video
- click Manage
- click Chapters tab
- add:
- a timestamp (
H:MM:SS) of the beginning of the chapter into Timecode field - a name for the chapter in Chapter name field
- a timestamp (
- repeat as many times as necessary the steps above
- click Update button
You can delete a chapter by clicking button in front of a chapter, and play the preview video to identify the timestamp.
Note that chapters can automatically be imported:
- from a video container
- from the external video platform when you import a video
- from the video description using
timecode chapternameformat:
my super video description

00:00 chapter 1
00:05 my super chapter 2
10:05 awesome chapter 3

other description stuff
Advanced settings
This tab allows you:
- to edit your preview image by selecting an image from your device or select a frame of the video;
- to add a short text to tell people how they can support you (membership platform...);
- change the original publication date;
- to choose if you want:
- to disable video comments
- to enable comment (with approval if you set an auto tag policy)
- that any new comment requires an approval
- disable/enable download of your video.
INFO
Click Update button to save your new settings.
Video confidentiality options: what do they mean?
- Public: your video is public. Everyone can see it (by using search engine, link or embed);
- Internal: only authenticated user having an account on your PeerTube platform can see your video. Users searching from another PeerTube platform or having the link without being authenticated can't see it;
- Unlisted: only people with the private link can see this video; the video is not visible without its link (can't be found by searching);
- Private: only you can see the video;
- Password protected: only users with the appropriate password can see this video; PeerTube >= 6.0
- Scheduled: hide the video until a specific date, where the video becomes public.
Upload a new version of a video PeerTube >= 6.0
INFO
This option has to be enabled by the PeerTube platform administrator.
WARNING
Uploading a new version of your video will completely erase the current version!
To upload a new version of a video, you have to:
- click on the button under your video
- click Manage
- click Replace file in the lateral menu
- drag and drop or select the new video file
- click Save and replace file button.
The re-upload date is displayed under the video player.